
Sealant information for Faceups (MSC, Munitorium Varnish, and other Aerosol sealants)
NOTE: This information is also good for anything else you want to seal with model-grade sealants; plastics and vinyls just have tendencies that need some addressing here!
Looking for specific information? Press Ctrl+F to find the keywords on the page.

Blushed Feeple60 Hands, coated with Citadel Purity Seal
I see the same questions being asked about using sealants indoors, what temperatures/humidity are best, and what equipment is necessary all the time. If you’re here for my doll work, maybe you’re interested in knowing what materials I use for my faces.
I’m going to start with four different types of plastics that react differently to the sealants I’ll talk about. These are:
Resin: A chemically cured plastic that doesn’t melt with heat and is generally resistant to chemicals.
ABS (styrene): Hard plastic that most play-line toy bodies are made of. MELTS IN ACETONE
PVC: Some older, denser toys have plastic that is slightly flexible. Depending on the composition, PVC may react badly to cheap sealants.
Vinyl: Vinyl can be firm or squishy, but the material behaves the same with sealants. Mr. Super Clear is your best bet for this material.
A wide variety of sealants are available worldwide, but there are three that are recommended for toy repainting (top). The ones that come after can be used on hard plastics.

Mr. Super Clear: The best option, but also the hardest to find and the most expensive. Comes in standard and UV-CUT, and finishes are Flat, Matte, and Gloss. Used for most high-end toy applications, such as BJD, Gundam, and Model kits.
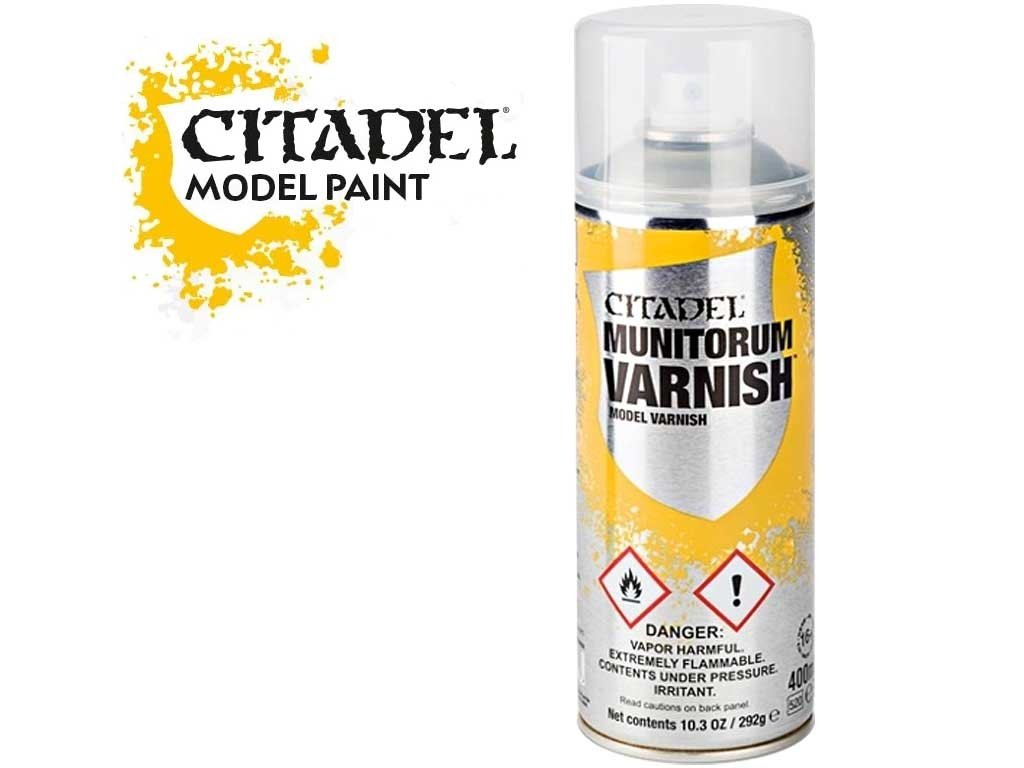
Citadel Munitorium Varish: Formerly known as Citadel Purity Seal: If you have a model or comic shop that sells tabletop miniatures, you are likely to find Citadel brand paints. This is the company that makes Warhammer and other high-end miniatures, and their sealants AND paints are formulated for good results on small details. These come in big cans that last a while.
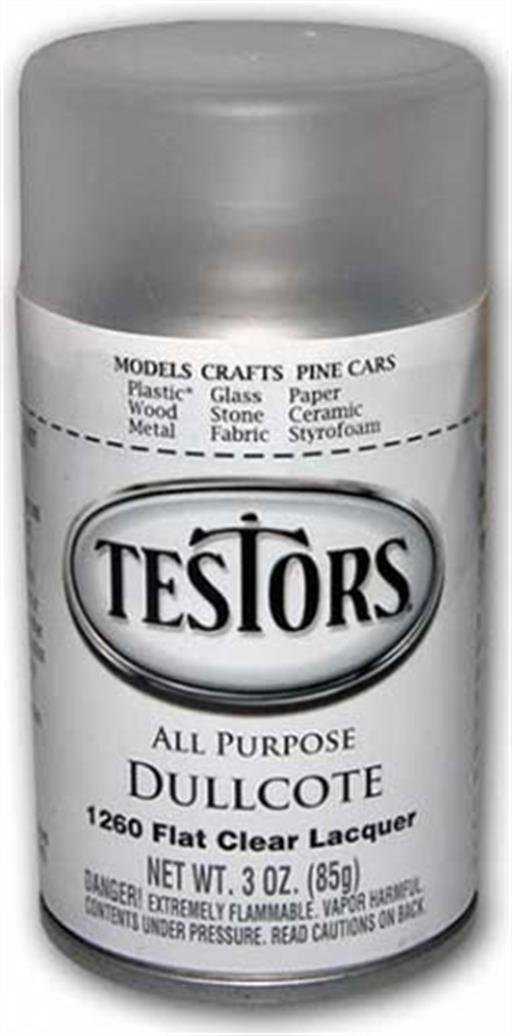
Testors Dullcote: Intended for model building and painting, these cans can be a little small.
If you’re just trying to do a repair or you’re doing your own faceups, this is a pretty good economical solution.

Krylon Matte finish can
Krylon: Krylon Matte doesn’t have as much tooth as the other brands do; it is primarily a protective finish with a matte look. You can do great faceups with this brand, but it may take more layers. This is by far your cheapest option if you’re not sure what you’re doing, yet! People have reported that this finish is difficult to remove; keep this in mind if you want to change something later.
If you’re here for Monster High and Barbie Customization, I highly recommend only using Mr. Super Clear. Any other aerosol sealant will react with the vinyl and become sticky.
FINISH TYPES
When you go to the store, there are usually a variety of clear finishes to choose from. Some are better than others, but if you’re just doing work on your own doll then the brand doesn’t matter quite as much.
Matte - The usual recommendation for faceup work, matte has a grainy tooth that you can feel once it dries completely. Ideal for working on, since it makes the surface feel like paper. It may pick up unwanted pieces of lint or smudges of dirt after a while.
Flat - My preferred finishing layer. Flat is not shiny or glossy, but has less tooth than the matte finishes. This makes the surface a little easier to keep clean, since it won’t pick up dirt and dust so easily.
Satin - Slightly glossy, but closer to flat finish. Satin is better for finishing artificial parts such as mechs and robots for that Gundam-type finish.
Glossy - The most common sealant, make sure you don’t get this for faceups. Glossy unifies the surface under a protective gloss layer. Usually ends up looking like lacquer. Easy to clean but doesn’t hold on to pigments.
High Gloss - Common for furniture, not really good for finishing BJDs. This is the glossiest finish you can find and makes a polished, sometimes mirror surface.
UV Cut- Some sealants, especially for toys, are labeled as UV protective or Non-Yellowing. UV protective sealant keeps light from reacting with resin, which bleaches out red pigments and turns the piece yellow. When used as a finishing and/or a base layer, UV cut does help preserve original colors for quite a bit longer. Consider a finish with UV protection if you like to photograph your dolls outside. Mr. Super Clear has a UV-cut option as well as a standard sealant option.
Pre-Application Notes
If this isn’t something you do consistently, don’t worry too much about buying the whole PPE Arsenal. If you do this as a hobby or as a job, you need a respirator. The fumes are toxic and carcinogenic; some solvents are more dangerous than others. I recommend a 3M brand respirator with organic filter cartridges; these particular ones will filter out the smell and the gases that you can’t see. You’ll find that you’ll be able to work longer and breathe easier when you’re wearing breathing protection! I’ll talk about proper PPE in another blog post.
Make sure oil and dust are wiped off your surface, preferably with soap and water. Dry and make sure you get water out of every crevice. Spray evenly from 8-12 inches away from the model.
**If you’re doing faceups, let the sealant set for about half an hour between coats. Especially for the first few layers. This maximizes the matte “tooth” and allows paint to stick better. This also helps avoid a “shiny” finish at the end if you have a lot of layers.

Citadel Munitorium Varnish, Gouache, and Pastel on a Resinsoul Mei
Sealant Problems
There are a lot of factors to consider when you’re deciding to seal something; what’s the temperature? How’s the air quality? How humid is it in your workspace?
The general recommendation is to work in above-freezing temperatures (35F or above), or warm the can of sealant before use. If you have a lot of ambient dust, the sealant may catch it and stick it permanently to the surface you’re spraying. If the air is too humid, or if the sealant hits a drop of water, the sealant may turn foggy and white. This doesn’t matter as much on lighter colored resin, but this WILL show on darker colors.
If the air is too cold, the spray may cure in mid-air or come out unevenly. I do not recommend trying to seal things if the ambient temperature is below 40°F (4°C).
I live in Alaska, so for a good portion of the year the temperature dips around or below 35F. I have a heated garage that I work in that has ventilation which allows me to do faceups during the winter.
If the air is too humid, the sealant may come out “frosty” or whitish. Try not to spray seal when the humidity is over 80% if you can help it. Buying a dehumidifier for the room you work in may help.
If the surface is not clean when you apply spray, the sealant may not bond properly to the surface and can flake off. If you use colored pencils in your faceups this is EXTREMELY IMPORTANT, since the colored pencils can scratch pieces of sealant off if it’s not bonded properly.
Application Detail Process
1/2* : Clean your surface with your solvent of choice. 90%+ Isopropyl alcohol and a Magic Eraser (Melamine Sponge) tends to work great to remove old faceups. Windsor and Newton brush cleaner is the best, but Acetone also works as long as you don’t soak the resin in it.
DO NOT USE ACETONE on ABS or PVC plastics. Acetone WILL eat the plastic and you may end up with a plastic soup. Use Acetone free nail polish remover instead.
1: Wash the surface with soap and water to remove dirt and oils. Dry completely with paper towels and let air dry.
2: Spray the bare resin with 2-3 base coats of matte spray, If you’re trying to color-correct, you can add layers of pastel after the second layer to start transitioning the color. let dry for 20-30 minutes between layers; this is the most important phase to do that.
3: Once the base layers have set, start with blushing or more color correction. Once you’re done, remove stray debries from the surface and spray again. Repeat for each layer of the faceup.
4: On your finishing layer, use your FLAT sealant to apply 2-3 coats. DO NOT TOUCH the sealant while it’s drying. This protects the paint and colors underneath from water and the elements.
5: Apply acrylic gloss, add eyelashes, piercings, jewelry, etc.
6: Let everything dry for about an hour and bam you have yourself a faceup.

A color-matched head for a mint green body. You can see the original resin color on the headcap.
MISC. NOTES
This process can be used for anything that involves painting plastic, but can also be used for wood or general pastel art.
I recommend sealants made for toys such as MSC or Citadel because they are formulated to preserve the plastic underneath. These are professional-grade sealants!
In a pinch, Design Master or Krylon brands will work. These sealants may yellow and may not have quite as much tooth, which just means you’ll have to do more layers. I HAVE done faceups with both and they lasted fine.
Ideally, a faceup’s lifespan with a lot of playtime is about 8 months to a year. If you only display your dolls and don’t touch them, the faceup can last for decades.
After some time, depending on light exposure, giving the face a fresh layer of pink or red blush can help refresh the look. This totally works for (Now possibly vintage…) older dolls. The oldest doll I have is from 2003 and her faceup is still largely pristine.
Narin Creative (Art—Bimong / Bimong Dolls) Narae 2003. Original faceup except for some touchup pink.